 So you’ve got two personal computers and you need to share a file from one to the other. What’s the best way to go about this? You might be surprised to learn that doing this is as easy as dragging and dropping.
Before we show you how to do this, let’s backtrack a bit and go over some of the most common ways that files are shared between two PCs.
- Via external memory device, like a USB thumb drive.
- Via email.
- Via a cloud data storage service.
All three of these options are easy to use, yet, they each have their drawbacks. For example, thumb drives are prone to getting lost or stolen, and both email and the cloud are dependant upon a working Internet connection controlled by a third party.
One solution that has neither of these drawbacks is a home network. Setting up a network for two or more of your computers is easy to do and doesn’t require a server unit, switches, and all the other IT gear like what your network at the office needs. Instead, if your personal computers are both connected to the same Internet router, then you’ve got what it takes to share a file between the two machines by simply dragging and dropping.
Use My Network Places
My Network Places is essentially a file on your PC shared between your two computers. You will be able to spot which PC is connected with the shared file because it will be designated by the PC’s assigned name. Once you spot the folder (use the Windows search bar to find it), drag and drop the file you want to share into it. You will then be able to access this shared content in My Network Places on your other computer.
Create a Windows Homegroup
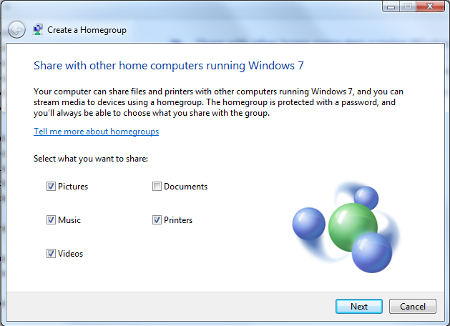
Another option for your home-file-sharing needs is to setup a Windows Homegroup. This is actually a better option than using My Network Places because it provides greater security. To set this up, type “homegroup” in the Windows search box and hit Enter. If Windows can’t find any existing homegroups on your network to choose from, click Create a homegroup.
Now select what kind of content and devices you want to share in this homegroup and click Next.

Windows will now generate the homegroup and provide you with a password to access it. Be sure to record this password in a place that’s safe.
To access your newly set up homegroup on your other computer, search for “homegroup” in the Windows search bar to bring it up. You will next be notified that a new homegroup has been set up. Now, click Next > Enter the password > click Next again > and your two devices will be able to easily and securely share files. You can even add multiple devices and users to this homegroup if you need to.
Sharing files over your home network is easy, but it gets more complicated when you’re dealing with multiple workstations on your office network. For assistance with your company’s networking needs, give Grove Networks a call at (305) 448-6126.
